
Reef Discussion
:mad: You know, I hate being pi$$ed around. Finally got around to calling to order the blue LED's which I was told they had in stock. Then get an E-mail saying they don't have anything I wanted. What ever happened to customer service in this country? Everything is now "all about me & I want it now" Lets try rapid tonight then huh. :mad:
Here endth the whinge.
Here endth the whinge.

Not that I'm excited or anything......
Sunday, November 06, 2011
Location
Time
13
Forwarded for delivery
VICTORIA STATE OUTLYING AREAS - AUSTRALIA
13:36 Friday, November 04, 2011
Location
Time
12
Forwarded for delivery
VICTORIA STATE OUTLYING AREAS - AUSTRALIA
12:32 11
Clearance processing complete at MELBOURNE - AUSTRALIA
MELBOURNE - AUSTRALIA
11:56 10
Arrived at Sort Facility MELBOURNE - AUSTRALIA
MELBOURNE - AUSTRALIA
11:51 Wednesday, November 02, 2011
Location
Time
9
Departed Facility in LOS ANGELES GATEWAY - USA
LOS ANGELES GATEWAY, CA - USA
13:08 8
Processed at LOS ANGELES GATEWAY - USA
LOS ANGELES GATEWAY, CA - USA
13:06 7
Arrived at Sort Facility LOS ANGELES GATEWAY - USA
LOS ANGELES GATEWAY, CA - USA
00:16 Tuesday, November 01, 2011
Location
Time
6
Departed Facility in SAN FRANCISCO GATEWAY - USA
SAN FRANCISCO GATEWAY, CA - USA
23:18 5
Processed at SAN FRANCISCO GATEWAY - USA
SAN FRANCISCO GATEWAY, CA - USA
23:16 4
Arrived at Sort Facility SAN FRANCISCO GATEWAY - USA
SAN FRANCISCO GATEWAY, CA - USA
19:21 3
Departed Facility in SAN FRANCISCO - USA
SAN FRANCISCO, CA - USA
19:16 2
Processed at SAN FRANCISCO - USA
SAN FRANCISCO, CA - USA
19:14 1
Shipment picked up
SAN FRANCISCO, CA - USA
14:22Well Jen went & picked up the LED's today. 52 royal blue & 26 blue. Still looking for another 26 blue's, these are the B4 bin, need the B3 bin now. Reckon I have to start putting the bit's I have together now. I know there's a soldering iron kit thingy in the garage somewhere. Have to admit tho, the service from Rapid is very good. If I wasnt so bloody tired, I would proberly be more excited about the project.
I have to build the frame for the heat sink's out in the garage as they are to big for my coffee table, & Jen wont let me leave it laying around on the dinning table either. Once I get all the sink's stuck together and in a frame, then I can set it up on the coffee table, this is MY room lol. That's what I tell myself, & Jen lets me belive it. :)
P.S- Has anyone heard how that requisition for a 9 day week is going?
Woody Mackay-
Umm, yeah kinda lol. Got the first lot of LED's, ordered the last lot on Tuesday just gone. I went looking for a dimmer that would work with the Mean-Well's and stumbled across a small electronics company up in QLD. Talk about service! sent a very short E-mail telling them I had 16 MW drivers, 208 Cree LED's and was looking for a dimmer. The guy sends back a bloody book saying he assumes we have wired them this way, blah blah group's with blah blah banks running blah blah amps at blah blah temp. Totally threw me. So I took the time to explain what LED's I had, how they would be wired and what we where looking for in a dimmer/controller. He sends back another book saying ditch the MW's and get 8 of another brand, (will find the name) Gives me the price of them, company name, address and phone number, "just get them from here" Recommends wiring them in this way, Three paragraph explanation on how to, only then does he go on to explain what HE can do and charge for. So much info given and leaves himself till last.
They would make a controller that will......
4 adjustable channels (CW,NW,RB,B)
Manually adjust each channel to where we want it
Switch it to auto and it will starting turning on the 1st channel till it reaches the setting you entered manually,
Then start the 2nd channel till it reaches the setting you entered manually,
Then the 3rd channel till it reaches the setting you entered manually,
Then the 4th channel till it reaches the setting you entered manually,
After a set adjustable amount of time, start turning everything off in reverse order,
No sudden drop off, true fade out to "0" on all channels,
Then repeat every day, or just leave it in manual and piss ass around with it myself.
Does other things also but I cant recall this early in the morn, I may add some more functions, dunno.
The electronic board stuff is mounted in its own box that can be hidden away where ever, the control panel is mounted in another smaller box and be remote mounted no more the 5M away from the board. All boxes are screen printed and finished off to a professional standard. All this for about $500 plus the cost of the power supplies. Which I would have had get 16 MW's. Will take two weeks to make so I'm REALLY hoping we can get it done before Christmas.
That's about thus far,
Anyone's thought's on the above please ?
MagicJ - I need more time in the week man!!
Sounds good Synodontis.
I would be very interested in finding out a bit more about the controller and drivers, and how he has recommended wiring the LED's.
PM sent.
I would be very interested in finding out a bit more about the controller and drivers, and how he has recommended wiring the LED's.
PM sent.
I'm down for that too.
Epic bud. I feel a little smarter walking into this thread. I hope your satisfied, I now have to counter balance that one functioning brain cell with a beer!
Epic bud. I feel a little smarter walking into this thread. I hope your satisfied, I now have to counter balance that one functioning brain cell with a beer!
MagicJ - If you could that would be great. :)
Basically, the wiring diagram I sent to Shane was not the best way to do a reef setup. It was wired in string's & parallel, which for reason's MagicJ can explain far better then I. So back to the drawing board and wait till Shane has finished MY $200 Arduino build for me! :rolleyes;):D (with interest of course!)
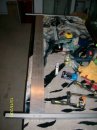
So what did I do today? Well I played in the garage, I can knock stuff up with metal, it's just the electronics I have trouble with. Especially when it comes to to writing stuff that sounds like C++, visual basic, Boolean or shit like that, I may as well try to learn Mandarin in three week's!
A little picture walk through of the day......
Step one..
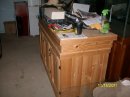
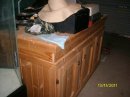
Look around until you find a suitable work bench


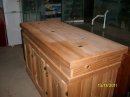
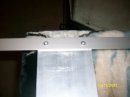
Step two..
Once you have found a work bench, clear the crap off it and throw down some sort of cover so you dont scuff the million dollar finish & upset the boss in doors. I used the old mink blanket I have hidden outside for when Jen crack's it & kick's me out of bed. :)


Step three..
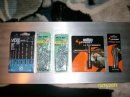
Slip out of the house while "she" aint looking & head down to Bunnings. Pick up a new set of drill bits, some bolt's, a tap to suit the bolt's you got from isle 7 & dont forget to get a tap wrench to turn said tap.Should only cost ya $65 for the cheap stuff. Only going to use it once and forget you ever brought it.

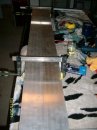
Step four..
Find some 25x25mm anodized aluminum angle as wide as the tank, run a tape over the thing and work out where you want the heat sink's to be. The first heat sink I put in was a bugger to get square and took some time. The angle is 760mm long, the spacing I have used starts at one end of the angle. 150mm to the start of the first heat sink, added the second heatsink hard up against the first giving a total width of 196mm. Then started at the other end of the angle, same again, 150mm in to the start of the first heat sink. That leaves a gap between the now TWO heat sinks of about 65mm. For the sake of typing this, all mm are give or take 2/3mm. I used the clamps to hold the second heat sink hard up against the first while I drilled and tapped the holes. Oh yeah, you should always have a coffee on hand when playing in the garage.


Step five..
Find an old tank that is close to the size your going to hang the light above. The tank I used is 2" narrower the 10ft, but it works to show how the spacing looks above the tank.


Now how easy was that! I do now belive MagicJ should knock up a Arduino build in picture form to show us all how to build one :Dor at least post an "Ultimate part's list" for a dream Arduino.
So that was my Sunday, well some of anyway's, played on the PC now & then, TV & lots of coffee!
TTFN
K&J
Basically, the wiring diagram I sent to Shane was not the best way to do a reef setup. It was wired in string's & parallel, which for reason's MagicJ can explain far better then I. So back to the drawing board and wait till Shane has finished MY $200 Arduino build for me! :rolleyes;):D (with interest of course!)
So what did I do today? Well I played in the garage, I can knock stuff up with metal, it's just the electronics I have trouble with. Especially when it comes to to writing stuff that sounds like C++, visual basic, Boolean or shit like that, I may as well try to learn Mandarin in three week's!
A little picture walk through of the day......
Step one..
Look around until you find a suitable work bench
Step two..
Once you have found a work bench, clear the crap off it and throw down some sort of cover so you dont scuff the million dollar finish & upset the boss in doors. I used the old mink blanket I have hidden outside for when Jen crack's it & kick's me out of bed. :)
Step three..
Slip out of the house while "she" aint looking & head down to Bunnings. Pick up a new set of drill bits, some bolt's, a tap to suit the bolt's you got from isle 7 & dont forget to get a tap wrench to turn said tap.Should only cost ya $65 for the cheap stuff. Only going to use it once and forget you ever brought it.
Step four..
Find some 25x25mm anodized aluminum angle as wide as the tank, run a tape over the thing and work out where you want the heat sink's to be. The first heat sink I put in was a bugger to get square and took some time. The angle is 760mm long, the spacing I have used starts at one end of the angle. 150mm to the start of the first heat sink, added the second heatsink hard up against the first giving a total width of 196mm. Then started at the other end of the angle, same again, 150mm in to the start of the first heat sink. That leaves a gap between the now TWO heat sinks of about 65mm. For the sake of typing this, all mm are give or take 2/3mm. I used the clamps to hold the second heat sink hard up against the first while I drilled and tapped the holes. Oh yeah, you should always have a coffee on hand when playing in the garage.
Step five..
Find an old tank that is close to the size your going to hang the light above. The tank I used is 2" narrower the 10ft, but it works to show how the spacing looks above the tank.
Now how easy was that! I do now belive MagicJ should knock up a Arduino build in picture form to show us all how to build one :Dor at least post an "Ultimate part's list" for a dream Arduino.
So that was my Sunday, well some of anyway's, played on the PC now & then, TV & lots of coffee!
TTFN
K&J
Attachments
-
 32.5 KB Views: 6
 -
 32.8 KB Views: 4
 -
 30.9 KB Views: 5
 -
 34.7 KB Views: 6
 -
 39.6 KB Views: 5
 -
 39.8 KB Views: 5
 -
 15.8 KB Views: 5
 -
 36.7 KB Views: 5
Yup, hang about, i'll grab my popcorn
Thanks for the comment's guys,
MagicJ - I could only get the cheap packets at Bunnings on Saturday. They didn't have the right thread in the stainless bolt's. It's just a matter of taking them out one at a time to replace with stainless bolts before the fixture's go above the tank. ;)
'vspec' - There's a stool by the fridge if you need it mate, help yourself to a beer to wash the popcorn down, but the black and yellow can's are mine! :)
VaultBoy - Your right, let's see if I can finish the bugger huh lol.
DavidS - Again, let's see if I can keep it that way for the whole build lol. I'd like to think it will come up ok.
I should have mentioned that I knocked up two of these units. They are both 5ft long and exactly the same for heatsink spacing. Another thing I should have said and taken pics of... Not sure if I needed it but, between the heat sink's I clamped together, I put some thermal paste, not a huge amount and I'm told it will not "run" even when over heated.
I'm not looking forward to tinning 208 LED's and soldering all the wire's either. Might go search YouTube to see how it's done.
Latest posts
- Replies
- 0
- Views
- 5
- Replies
- 0
- Views
- 17
- Replies
- 0
- Views
- 16
- Replies
- 0
- Views
- 17