
Out With The Old Sump, In With The New Sump!
Okay so my auto top off has been sitting waiting for this sump swap for over a year (yep, I get to things quickly around here!) and the filter sock holder and filter socks have been waiting for about half that amount of time.
With the impending dosing pump addition (just waiting on some custom acrylic brackets to be made) I needed to make some changes.
I didn't need the 3 chamber sump as I'm not running a fuge (too small to be beneficial) and I wanted a larger water volume in the return in case the ATO fails (it's actually plumbed to run through a wall into the kitchen beside a set of drawers, away from little fingers - I didn't want it beside the tank (and that's just ugly)
OLD SUMP
Had 3 chambers, inlet which left a lot of bubbles which caused a lot of salt creep (drove me mad) first chamber also had the old skimmer, the centre fuge (too small to do anything other than collect detritus) and the return - I found the return really too small without an auto top off - having to top off daily to keep everything happy) It looks quite large, but from front to back it was far too shallow.

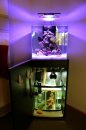
NEW SUMP
You can't really see the inlet with the filter sock, it's behind the skimmer, surprisingly easy to get to though. The skimmer is very easy to pull out for cleaning - just remove cup, pull out.
The Auto top off float height allows for enough water to be able to return down into the sump when return pump is off (it doesn't go above the glass panel that's there to reduce micro bubbles (I've never really had an issue with micro bubbles, the baffle is there because it can be.


NEXT PLAN
Waiting for my oxydator to turn up, so it can also go into the set up. Not sure where it will go at this point, I was going to pop it into the return chamber as there is lots of room there, but going to do a bit more research first. I may put it under the skimmer (as that has to be raised anyway)
And the Dosing Pump!
With the impending dosing pump addition (just waiting on some custom acrylic brackets to be made) I needed to make some changes.
I didn't need the 3 chamber sump as I'm not running a fuge (too small to be beneficial) and I wanted a larger water volume in the return in case the ATO fails (it's actually plumbed to run through a wall into the kitchen beside a set of drawers, away from little fingers - I didn't want it beside the tank (and that's just ugly)
OLD SUMP
Had 3 chambers, inlet which left a lot of bubbles which caused a lot of salt creep (drove me mad) first chamber also had the old skimmer, the centre fuge (too small to do anything other than collect detritus) and the return - I found the return really too small without an auto top off - having to top off daily to keep everything happy) It looks quite large, but from front to back it was far too shallow.
NEW SUMP
You can't really see the inlet with the filter sock, it's behind the skimmer, surprisingly easy to get to though. The skimmer is very easy to pull out for cleaning - just remove cup, pull out.
The Auto top off float height allows for enough water to be able to return down into the sump when return pump is off (it doesn't go above the glass panel that's there to reduce micro bubbles (I've never really had an issue with micro bubbles, the baffle is there because it can be.
NEXT PLAN
Waiting for my oxydator to turn up, so it can also go into the set up. Not sure where it will go at this point, I was going to pop it into the return chamber as there is lots of room there, but going to do a bit more research first. I may put it under the skimmer (as that has to be raised anyway)
And the Dosing Pump!
Attachments
-
 127.4 KB Views: 545