Tank Journal Archive

ViralEntity

Member
Feb 13, 2013
148
81
Warragul
The Build Begins
When planning this tank, I spent hours reading peoples tank journals, both here and on other sites. My favourites are the ones that go into great detail about the wins/losses they encountered on the way and I believe as a result I have made far less mistakes than I would have.

When I made the choice to go with a Red Sea Reefer, t here were plenty of journals online but it was still hard to get info on things such as measurements when planning cable positions. I hate getting 90% into something only to learn that that the heater/pump/skimmer/whatever has a lead too short to reach my fancy power setup…. So the goal of this journal entry is provide as much info as I can related to the setup of the Reefer 350 as a bit of a thank you to all the people I may have stolen ideas from :) with pretty pictures to match.

IMG_0572.JPG
 

ViralEntity

Member
Feb 13, 2013
148
81
Warragul
Cabinet Installation

I broke my rule straight up - I didn’t take any photos of the cabinet being put together. What I can do is stress how easy it is.

IMG_0571.JPG


The cabinet is solid and heavy, there is no other way to explain it. It comes completely flat packed and well protected to avoid scratches, but the finish is actually quite tough if not abused. We laid out the cardboard from the packaging anyway just in case, but it would be fine to do on carpet or a rug. The best I can do is liken it a really high quality Ikea cabinet in terms of how it is put together - but the instructions are about as clear as an Ikea cabinet. While the pictures are good and the steps fairly simple, not one piece is labelled and you rely on matching the holes to the layout on the back sheet to determine which side is being used. Not difficult, just something to note if you are not at all inclined to building this sort of thing. One trick we did pick up is to align the rubber mats to help determine which way each side faced.

Just on that, the cabinet comes with a fully lined sump section, with 5mm rubber/foam used. It also has a similar layer that’s a tad thicker right across the top of the cabinet for the tank to rest on. I wasn’t expecting this and was quite impressed with how neat it looks. I expect the sump part will dramatically reduce small vibrations from the skimmer and return pump.

IMG_0569.JPG


IMG_0568.JPG


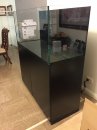
In the 350 model, the cabinet is split into two sections by a solid wall. The sump side has a small cut out in both the back and top of the cabinet that can be seen in the photo above and allows the bulkheads extend below the glass of the tank. The last section has a partial back wall that is 60% open and is quite roomy ~39cm wide, which is enough to fit a standard 20/25L drum with room to spare. My only concern is the solid joining wall. If I want to mount power boards and controllers in the side section, the cables have to be long enough to extend along the side, out and up across ~15cm and then in the gap in the sump section and down to the sump. Probes and heaters are my main concern as these tend to be shorter leads and I personally am not a fan of mounting expensive controllers above an open sump.

The doors are neat, well sized and with decent hinges. Mounting them solo could be challenging, but it was easy with a second set of hands. Fine adjustments are also really easy and worth spending time on, just note that if you align the back edge of the doors with the edge of the cabinet you will end up with a sizeable gap in the middle (~4-5mm). It's not huge but you can see the sump and any lights will definitely be visible. The other surprise when I saw it in the shop, was that it has no door handles. Rather it uses a spring loaded mechanism to open the doors which I love, but so do the kids!

IMG_0570.JPG


About the only thing that I felt wasn’t quite up to spec considering the quality of the unit is the plastic 'feet' that it came with. Due to the nature of them, they are not 100% the same and slightly uneven. I would have thought at this price they would have used adjustable feet, and I did consider not using them at all and just rest the tank on the tiles directly, but the floor was level enough to not require this.

All in all, an amazing bit of kit and well thought out. I reckon it took all of 30mins to put together with my Wife using only a screwdriver, not to mention 'help' from a 2 and 4 yr old :cool:
 

ViralEntity

Member
Feb 13, 2013
148
81
Warragul
Cabinet Lighting:

Seeing as this is such a nice cabinet, I wanted the cabinet lighting to add to the look, not detract. Back in my early RSM days, I had considered using small LED's as mini spot lights but could never work out a way to mount them permanently and not damage the cabinet. While chasing down Eggcrate at the local lighting store, I noticed they had waterproof LED strip lights for sale, complete in box with a 12v power adapter for $40. A quick search on eBay showed that this is quite cheap and I bought it on the spot.

P6180789.JPG


The cabinet has a slight lip all the way around so by running the strip around the top the LED's aren't visible. I mounted them up with bluetack to get a feel for how it looked and take measurements and work out where to mount the switch and power supply.

IMG_0550.JPG


IMG_0551.JPG


This was the first hurdle I hit. As I mentioned above, the two sides are separated, and there is no easy and clean way of running the lights in a solid strip from one side to the other. So I mounted the light switch in the middle of the two doors:

IMG_0565.JPG


Then I ran the power in the right hand side and the first run of LED in the Sump side. Even though it is water proof I used a small plastic project box I had lying around attached with Velcro to the side, to protect the join in the cable and hide the excess wire:

IMG_0564.JPG


I then cut off the LED's to the length required for the sump side and checked all they still worked:

IMG_0552.JPG


As you can see, one bonus I hadn't counted on was the lack of shadows! Being such a diffuse light source, it didn't matter what I did, I couldn’t block the light so I was completely sold. Now came the hardest bit - re-joining the two sides. I used a piece of wire left over from my LED retrofit kit to join the two, measured to account for the distance between to the two halves of the cabinet. The problem is the solder patches are tiny, maybe 2x3mm max and although pre-tinned, on my first attempt the solder came free causing me to have to shorten the LED string to get a new pair of patches.

Orion up close_1.JPG


Once soldered, it was just a matter of feeding it through the cabinet and attaching via the self-adhesive backing.

IMG_0567.JPG


IMG_0566.JPG


The result - absolutely amazing.

IMG_0553.JPG


IMG_0554.JPG


Really happy with the way it has come up :D
 

ViralEntity

Member
Feb 13, 2013
148
81
Warragul
Mounting the Tank:

Not a great deal to comment on here. The tank itself was really well packaged and padded, with the sump and reservoir packed inside with all the fittings and pipework. The sump and reservoir were also well packaged.

IMG_0574.JPG


IMG_0579.JPG


IMG_0580.JPG


My only comment, which I wouldn’t have done any way, was to make sure you remove the loose pipes from the overflow before lifting the tank into place. My brother-in-law left his in his 450, and when the tank was lifted into position the pipes dropped through the bulk heads and almost got crushed. A bit swearing and sweating and they were removed in time but I just thought I would mention it.

IMG_0575.JPG


IMG_0576.JPG


IMG_0577.JPG
 

Attachments

ViralEntity

Member
Feb 13, 2013
148
81
Warragul
Wow , This is going to be a great build. I have never seen lighting like that in a cabinet.
I hadn't seen it either, but stumbled on it last night in another forum for a RSR350 build. Really cheap, easy to mount (especially if you don't solder it or use the kits that come with connectors) and water proof. What more could you want?
 

MagicJ

Moderator
Jul 11, 2011
9,650
3,761
Hobart, Tasmania
Great write-up, thanks :)

I wonder about putting the stand straight onto tiles - I have no experience either way but the possibility for a cracked tile at some time in the future might concern me. But, maybe I just worry about nothing :rolleyes
 

ViralEntity

Member
Feb 13, 2013
148
81
Warragul
That's an interesting comment - I never considered damage to the tiles, I always worried about an unlevel tank. I have left it on its rubber/plastic feet for the moment, but if it doesn't settle right maybe will need to put something under it. I would be interested to see what others do as this is the largest tank I have owned.
 

Aspidites

Member
Dec 1, 2012
600
209
South lake
If the base of the stand is flat all the way round then the weight of the tank is spread out and not directed onto the pressure points. (I.e. the feet) there should be less chance of tile damage provided they ars fairly flat.