Reef Discussion

MagicJ

Moderator
Jul 11, 2011
9,650
3,761
Hobart, Tasmania
Wireless Temperature Sensor
There doesn't seem to be as many DIYer's around now as there used to be 10-15 years ago but hopefully someone will learn something from this thread :)

Following on from the introduction to the ESP8266 WiFi module provided by @Rob here I thought it was time to demonstrate a practical example of what it can do.

This is not a particularly difficult DIY project, and it could be made a little easier which I will cover in a future post. I will detail all of the hardware required and will also provide all the software, or sketch in Arduino speak, although I must admit that most of the coding, in part, was already available elsewhere on the internet. Most of my time has been spent finding the cheapest way to manage the sensor readings.

So, what does it do?

This will be a relatively simple temperature sensor that connects to your home WiFi network and, not surprisingly, measures the temperature of your water. It has also been designed to do various things if the temperature is outside of predetermined limits.

In summary :

  • it can serve a basic webpage to display the current temperature - this can be viewed on any device connected to your home network and be updated at a predetermined time frame i.e. every 30 seconds
  • it can send the data to a third party website which can store the data and be viewed from any device connected to the internet
  • it can send an email and/or an SMS if a specific event occurs i.e. the temperature falls below a predetermined level
  • it can save the data to a spreadsheet for future analysis
Do I have anyone interested?
 

Rob

Member
Apr 26, 2012
743
424
I regularly present at a meetup group in moorabbin Vic on the second wed of the month. next month (June 8th) for anyone interested I will be doing a presentation on IOT & ESP8266. Its really a 1.5hr presentation on connecting temperature, humidity, flow meters etc to the small $10.00 chip which also creates a web page of the data, perfect for tank monitoring.

The group welcomes anybody interested in technology / DIY / raspberry pi & microcontrollers, no fee to attend and there's usually only around 20 people. PM me for details...
 

MagicJ

Moderator
Jul 11, 2011
9,650
3,761
Hobart, Tasmania
Despite the lack of an update for 2 months, I have been progressing this project :)

I have been using it to control my heaters via the additional of a 240v relay module, although that is an added extra rather than something most people would want. I have had some issues with the module failing to respond which is not necessarily a good thing when you are relying on it to turn your heaters on or off !! But, I think I have now got that solved - the following is a graph showing the temperature readings over the last 22 hours, or so.

upload_2016-8-5_21-20-56.png


The DS18b20 temperature sensor has been used with a resolution of 0.125 degrees C, but with a deemed accuracy of +-0.5 degrees C - I actually think the accuracy is much greater than that, especially around the temperatures we are measuring.

I am very happy with the results - I currently have the module set to turn on at 24.95 and off at 25.15 - the reported temperatures range from 24.94 to 25.12 which is very close to the setpoints.

I will let it run for another 12 hours and review the results.
 

MagicJ

Moderator
Jul 11, 2011
9,650
3,761
Hobart, Tasmania
So, what do we actually need to make this temperature sensor?

  1. An ESP8266 module - there are a number of different formats available. At the most basic level is the '01' version
    arees52.com_544_home_default_esp8266_serial_esp_01_wifi_wireless_transceiver_module_.jpg

    These can be purchased for less than $3 (ebay) and do work ... but ... they are difficult to program and don't have an on-board voltage regulator and so need to be provided with a 3.3v supply which can also be a little difficult. This board also has only 2 GPIO pins available which can be be a bit restrictive.

    I would recommend the '12-E' version, which is also commonly referred to as a Nodemcu Lua Development Board.
    upload_2016-8-6_21-10-9.png

    Whilst somewhat larger, this board has most of the pins available, has an on-board voltage regulator so it is happy to be supplied with 5v (an old phone charger comes to mind) and has a micro USB for easy programming. These can be purchased for around $6.30, so still relatively cheap (ebay)

  2. Power Supply - a 5v supply is ideal. An old 5v phone charger will be fine, or you can buy something like this
    upload_2016-8-6_21-17-49.png

    You can get these for around $3.50 (ebay)


  3. A DS18b20 Temperature Sensor - you will find a lot of cheap ones on ebay that look like this
    upload_2016-8-6_21-23-17.png

    Unfortunately, these have a stainless steel cap on the end which will not survive long in salt water. You can purchase a sensor with a plastic cap from Little Bird Electronics for $15 plus postage
    upload_2016-8-6_21-28-27.png

    Or, I might be able to supply something similar for about half the price ;)
A few wires. connectors and a box to put it all in is all that you need.
 

Rob

Member
Apr 26, 2012
743
424
Some accessories to consider ..... in addition to the temperature sensor.

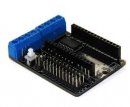
The following board allows you to connect devices easily to the ESP 12E. Has a set of three pins per channel so all you need to do is put connectors on the end of your sensor wires and plug it in. It also has two motor outputs which could in fact drive dosing pumps or switch a relay on/off
esp motor.jpg

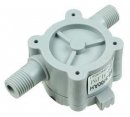
How about monitoring your ATO flow. I have connected one of these up and it works well. Again just three wires connected to the board above. The flow meter below is 0.8 - 8 L/min however there are lots of sizes. Paid $10.00 for mine.
flow.jpg


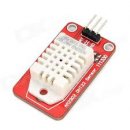
And of course finally ambient temperature and humidity. Cannot go past one of these DHT sensors. Three wires plug straight into the board.

dht.jpg


I have some code to share which incorporates all three of these sensors and provides the results on a simple web page served directly from the device. i.e. the ESP8266 is in fact a micro web server.
 

Sam Parker

Moderator
May 6, 2013
4,802
2,397
Geelong
Some accessories to consider ..... in addition to the temperature sensor.

The following board allows you to connect devices easily to the ESP 12E. Has a set of three pins per channel so all you need to do is put connectors on the end of your sensor wires and plug it in. It also has two motor outputs which could in fact drive dosing pumps or switch a relay on/off
View attachment 54747

How about monitoring your ATO flow. I have connected one of these up and it works well. Again just three wires connected to the board above. The flow meter below is 0.8 - 8 L/min however there are lots of sizes. Paid $10.00 for mine.
View attachment 54748


And of course finally ambient temperature and humidity. Cannot go past one of these DHT sensors. Three wires plug straight into the board.

View attachment 54749


I have some code to share which incorporates all three of these sensors and provides the results on a simple web page served directly from the device. i.e. the ESP8266 is in fact a micro web server.

Stop it! Just take my money!!!!
 

MagicJ

Moderator
Jul 11, 2011
9,650
3,761
Hobart, Tasmania
SOFTWARE

There are a number of languages which can be used to program the ESP8266 - mainly because of my familiarity with the Arduino, I currently use C++ via the Arduino IDE. There are lots of tutorials on the net on how to install the software - I don't propose the reinvent the wheel, so I will just point you to this tutorial.

(For anyone interested in some further reading, I highly recommend http://randomnerdtutorials.com/)

Downloading Arduino IDE
First download the Arduino IDE to ensure that you have the latest software version (some older versions won’t work), visit the following URL: https://www.arduino.cc/en/Main/Software.

Then select your operating system and download the latest software release of the Arduino IDE.

Installing Arduino IDE
Grab the file that you have just downloaded and open the Arduino IDE application file (see Figure below).

ai2.wp.com_randomnerdtutorials.com_wp_content_uploads_2015_09_aa12050fa2bf56b582f7e617c8f6bc7e.png


When the Arduino IDE first opens, this is what you should see:

ai0.wp.com_randomnerdtutorials.com_wp_content_uploads_2015_09_b4c472587aafddf5b2c5a562996bb9b9.png


Installing the ESP8266 Board
To install the ESP8266 board in your Arduino IDE, follow these next instructions:

1) Open the preferences window from the Arduino IDE. Go to File > Preferences

2) Enter http://arduino.esp8266.com/stable/package_esp8266com_index.json into Additional Board Manager URLs field and click the “OK” button

ai0.wp.com_randomnerdtutorials.com_wp_content_uploads_2015_09_5351229341be452893fb10c6d5f9a68c.png


3) Open boards manager. Go to Tools > Board > Boards Manager…

ai1.wp.com_randomnerdtutorials.com_wp_content_uploads_2015_09_6491d434b0f659b2e1c7696c5c63e0a3.png


4) Scroll down, select the ESP8266 board menu and install “esp8266 platform”

ai2.wp.com_randomnerdtutorials.com_wp_content_uploads_2015_09_0800864bb93cc151c0d6e21c1c791a36.png


5) Choose your ESP8266 board from Tools > Board > Generic ESP8266 Module

ai1.wp.com_randomnerdtutorials.com_wp_content_uploads_2015_09_c9727a1bba6fa26054c1f85f969fcef6.png


6) Finally, re-open your Arduino IDE

We also need to install a couple of libraries the support the DS18b20 Temperature Sensor

Installing the libraries

You’ll need to install the OneWire Library and DallasTemperature Library.

Installing the OneWire Library
  1. Click here to download the OneWire library. You should have a .zip folder in your Downloads
  2. Unzip the .zip folder and you should get OneWire-master folder
  3. Rename your folder from OneWire-master to OneWire
  4. Move the OneWire folder to your Arduino IDE installation libraries folder
  5. Finally, re-open your Arduino IDE
Installing the DallasTemperature Library
  1. Click here to download the DallasTemperature library. You should have a .zip folder in your Downloads
  2. Unzip the .zip folder and you should get Arduino-Temperature-Control-Library-master folder
  3. Rename your folder from Arduino-Temperature-Control-Library-master to DallasTemperature
  4. Move the DallasTemperaturefolder to your Arduino IDE installation libraries folder
  5. Finally, re-open your Arduino IDE
 

Sam Parker

Moderator
May 6, 2013
4,802
2,397
Geelong
I'd just like to say I really appreciate the work you put into stuff like this and then share it with us all.

Owe you a beer in September
 

MagicJ

Moderator
Jul 11, 2011
9,650
3,761
Hobart, Tasmania
HARDWARE

As with the software, there are lots of tutorials available to show how to connect a DS18b20 temperature sensor to an ESP8266 - Google is your friend :)

But, as a starter, this is how you want to connect the parts together

upload_2016-8-9_19-51-26.png


Please post here if you have any problems.
 
  • Like
Reactions: Rob

MagicJ

Moderator
Jul 11, 2011
9,650
3,761
Hobart, Tasmania
I like this idea :D
I have ordered a few modules from China but I'm not sure if they will get here in time ...

So, I have just ordered a couple of extra modules from Australia - they are a bit more expensive but that just means I won't be able to feed my kids tonight :eek
 

MagicJ

Moderator
Jul 11, 2011
9,650
3,761
Hobart, Tasmania
So, I have just ordered a couple of extra modules from Australia - they are a bit more expensive but that just means I won't be able to feed my kids tonight :eek
These were meant to be coming from Darwin, but they actually got sent from China :mad:
The seller claims that there was a problem with the 'system' and they got sent from the wrong warehouse - unfortunately for him, I don't believe this story. So, if I don't receive a refund by tomorrow I will be reporting the seller to ebay for false advertising, although I doubt they will do much about it !!

In the initial reply, I was offered $1 as compensation :rofl